**Part 3: DDGI Overview**
[Dynamic Diffuse Global Illumination](index.html)
2019 May 3
Updated 2019 May 3
[ <== Previous Page: Global Illumination](intro-to-gi.html)
[Next Page: Algorithm Deep Dive ==> ](algorithm.html)
This part of the DDGI article describes integrated ray-traced glossy
GI and dynamic diffuse GI at a level suitable for a product manager or
art director to begin evaluating the technique. I describe the
previous state of the art techniques and show many examples of DDGI
handling particularly difficult cases.
Glossy GI
============================================================================
Environment Maps
----------------------------------------------------------------------------
Glossy global illumination effects produce the recognizable
reflections and highlights seen on shiny surfaces. Since the 1970s,
glossy GI has been approximated with reflection maps
[#Blinn76]. The core technique has been expanded over time with various clever
parallax distortions and for surfaces of varying roughness.
These are also known as environment maps, environment probes, radiance
probes, and light probes. These are distinct from the "irradiance probes" that
I'll mention for diffuse GI shortly.
Except for car racing games, which often render a single reflection
probe in real-time, most real-time programs use baked (precomputed)
probes. This means that dynamic objects and lighting conditions cannot
affect reflections.
Some tricks such as rendering mirrors to texture, rendering the scene
inverted, and grabbing distorted samples from the screen or skybox
have been used in specific titles for planar reflectors. But none were
general purpose real-time glossy GI solutions; that requires ray tracing.
Ray Tracing
----------------------------------------------------------------------------
For the past several years, screen-space ray tracing has been used as
an approximation of reflections between close objects that are both
visible on the screen. This first appeared in CryEngine 3 [#Sousa11]
in its modern form, and was quickly adopted and extended by many games
[#Wronski14] [#Valient14] [#Stachowiak15]. I analyzed this technique in detail in a
[previous research paper](http://jcgt.org/published/0003/04/04/).
Screen-space ray tracing of course cannot produce glossy reflection
of objects or parts of objects that are not on screen. True geometric
ray tracing solves that problem [#Deligiannis19] [#Qian19]. Today, many games use at least
one and sometimes both of these techniques simultaneously.

Algorithm
------------------------------------------------------------------------
Glossy GI on a perfect mirror is straightforward to render. For
mirrors, the shaded value at the ray hit is the glossy GI value. For
rough surfaces that produce blurred reflections, there are two
choices. You can trace stochastic rays distributed according to the
roughness and then blur out the noise, or trace perfect mirror rays
and then blur the mirror reflection. Both approaches work with both
screen-space and geometry ray tracing.

The figure above shows glossy GI rendered by this process. *Step 1* traces
a G-buffer that was half the vertical resolution of the screen by generating
a mirror reflection ray at each pixel. I halved the resolution
to double performance. I chose to do so vertically because most
reflections for this content were on the floor and are thus vertically
blurred anyway in screen space.
I then ran the regular deferred shading code on the mirror G-buffer.
The default [G3D](https://casual-effects.com/g3d) deferred shader
can reconstruct hit position and view direction from the z-buffer and pixel
coordinate (as most deferred shaders do), or by explicitly reading them
from buffers. For this case, I passed the ray hit and direction buffers
because the shading should be in the reflected direction and not towards
the camera. G3D has persistent shadow maps, so the shading was able to
compute direct illumination shadows from those. In an engine such as Unreal
that uses transient shadow maps, it is probably best to use shadow ray casts
on reflection points. The second order glossy GI and the diffuse GI
on the points seen in reflection were both computed with DDGI.
*Step 2* blurrs the mirror buffer [#Valient14] at progressively larger scales
into a MIP map chain. The blurring respects edges using a bilateral filter.
It also blurs into areas that have no reflection result at all, so that bilinear filtering
in the following step will not hit black.
*Step 3* samples this glossy GI at primary surfaces. It computes the
correct MIP level to sample based on the roughness of the primary
surface, its distance from the camera, and the distance of the
reflected object (secondary surface) from the primary surface.
I chose to blur mirror reflections instead of stochastic glossy ones because
I've found it easier to avoid per-pixel flicker (also known as "specular aliasing" and "fireflies") this way. The result is slightly less
physically correct.
In general, per-pixel flicker is the main image quality challenge with
glossy GI. Final-frame TAA both can help and hurt; it fixes some aliasing, but
has to deal with motion vectors that are inconsistent on the reflected object
versus the reflective surface, and then the TAA camera jitter also reveals the
aliasing on bright highlights. I also run FXAA over the image
as a result and disable parallax mapping
and normal mapping on surfaces seen in reflections. You could imagine using TAA on the reflection buffer itself
instead of the final frame to address the motion vector problem.
As general advice, apply everthing that you already know about
filtering for primary rays in the glossy shader, including geometric
LOD, MIP bias, and normal to roughness.
On RTX 2080 Ti for this scene with a few million polygons, the
complete glossy GI pass cost between 1 and 2 ms depending on
viewpoint, at 1920x1080 resolution. This includes the amortized cost
of BVH refit.
Mixing in less expensive screen-space reflection for very nearby
objects and environment probes for very distant ones can roughly halve
this cost by shortening rays. Checkerboard rendering instead of
half-resolution may improve image quality at the risk of more
horizontal aliasing, or it could be combined with half-resolution
and/or DLSS for lower cost, especially on less powerful GPUs.
Previous Diffuse GI
===============================================================
Dynamic glossy GI was solved by ray tracing several years ago. What
the field has been working on was handling off-screen objects (via
accelerated geometry ray tracing and DXR), increasing performance
(again, DXR), and avoiding flicker and noise (an ongoing
process).
Diffuse GI has never had a robust, dynamic, and efficient solution.
However, there have been many good previous ideas and good results for
specific applications and scenes.
Strategies
---------------------------------------------------------------
Some strategies that real-time renderers have previously used for
diffuse global illumination are:
- *Light maps* [#Quake97] [#Mitchell06]
- *Irradiance probes/voxels* [#Greger98] [#Tatarchuk05] [#Ramamoorthi11] [#Gilabert12]
- *Virtual point lights* [#Keller97] [#Kaplanyan10] [#Ding14] [#Xu16] [#Sassone19] [#White19]
- *Reflective shadow maps* [#Dachsbacher05] [#Kaplanyan10] [#Ding14] [#Malmros17] [#Xu16] [#White19]
- *Light propagation volumes* [#Kaplanyan09] [#Kaplanyan10]
- *Sparse voxel cone tracing* [#Crassin11] [#McLaren16]
- *Denoised ray tracing* [#Mara17] [#Schied17] [#Metro19] [#Archard19]
Baked light maps and light probes are the dominant techniques right
now for DX11-class games and are supported by most game engines.
The [Enlighten](https://www.siliconstudio.co.jp) middleware can also update
light maps and probes at runtime using simplified models. It has been used
in several games and is part of the inspiration for DDGI. Similar techniques
have been employed by some other renderers for slowly updating data structures.
In addition to this list, there are many other research techniques for
real-time GI. The methods that I listed above have been documented as
shipping in games. The citations are representative but not intended to be comprehensive. See
[_Real-Time Rendering_](http://www.realtimerendering.com/) 4th edition
for a complete survey of techniques.
I'll focus the evaluation here on classic irradiance probes because that is
the previous technique that DDGI accelerates and upgrades. The limitations
of these classic irradiance probes are representative of the problems
that most of the above techniques experience.
Classic Irradiance Probes
----------------------------------------------------------------------
The technique of sampling and storing the irradiance field at sparse
locations goes back to 1998 [#Greger98] and is supported by most
engines today.
The engine fills the scene with small probes that measure and store diffuse
GI. This is mathematically [irradiance](https://en.wikipedia.org/wiki/Irradiance), the integral of incident radiance weighted by a clamped cosine:
$E_\mathrm{e}(X) = \int_{\Omega} L(X, \w) \max(0, \w \cdot \n) ~ d\w$, where $\n$ is the direction
in which irradiance is measured (the normal), $X$ is the point, and $L$ is the radiance
function.
Irradiance probes are usually baked offline, although some engines
have updated them at runtime by casting rays against very low level of
detail (LOD) versions of the scene, relighting [#Gilabert12],
splatting low LOD points, or rasterizing and blurring cube maps.
,
[Unreal](https://docs.unrealengine.com/en-us/Engine/Rendering/LightingAndShadows/IndirectLightingCache),
[Far Cry 3](https://www.gdcvault.com/play/1015326/Deferred-Radiance-Transfer-Volumes-Global)](x3-irradiance-probes.jpg width=80%)
The probes themselves each represent samples over a full sphere of directions.
They can be mapped to texture memory as tiny cube maps, spherical harmonics, octahedral maps, dual paraboloids,
or any other spherical projection.
The quality of irradiance probes is very good. For a surface that is
just next to a probe, the result is in fact perfect. However, there
are three problems with probes. First, baking the probes slows down
artists when moving geo and lighting during production. Second,
because the probes are usually static, they can't change at runtime to
reflect changing object locations or lighting. The third problem is
the most serious. Probes leak light and shadow, which creates image
quality problems as well as requiring even more artist time to work
around this limitation.
Light Leaks
--------------------------------------------------------------------------
If the lighting changes radically near a probe because of a wall, they
can bleed light inside of a room from outside sun. Or bleed darkness
outside.
The slides in the following image are from a specific Treyarch
presentation at SIGGRAPH. But everybody has the same problem and this
topic is raised nearly every year at GDC or SIGGRAPH, with a different
clever solution for trying to hide the problem each time.
![Slides from a game developer SIGGRAPH talk [#Hooker16] explaining the light leaks from irradiance probes.](x3-probe-leaks.jpg width=80%)
For the image on the top, the bright area on the ceiling is sunlight
on the roof bleeding in.
If the probe lands inside of a wall, then all that it sees is darkness
and it bleeds shadow everywhere. The dark shadow on the door on the
lower right image is because the probe behind the door is bleeding
shadow out.
The state of the art is to have artists manually move each probe to a
good location and manually place blocker geometry to divide inside and
outside. That is another huge workflow cost. This is what Hooker’s
talk was actually about: the tool that they created to help artists
manually inject visibility information.
Moving the probes also doesn't help if you want to get to runtime
dynamic probe lighting. If you update lighting at runtime, then
dynamic geometry or a character might be covering up a probe no matter
where you place it.
I showed examples here for classic irradiance probes.
But leaking and discontinuities are a problem for all previous
real-time GI solutions. For example, here are some examples for light maps. You could
find the same for light propagation volumes and sparse voxel octtrees.
![Seams and leaks due to light map parameterizations. Image credits:
[#Iwanicki13],
[Unreal 1](https://answers.unrealengine.com/questions/336484/light-leaking-problem-solid-geometry.html),
[#Rakhteenko18],
[Unreal 2](https://www.worldofleveldesign.com/categories/udk/udk-lightmaps-03-how-to-fix-light-shadow-lightmap-bleeds-and-seams.php)](x3-lightmap-leaks.jpg width=80%)
This is an underlying flaw in the algorithms that we all inherit, and
not an implementation bug of any particular game or engine. I used
several Unreal forum images only because it was easy to find
documentation of problems developers are facing there. The same problem
occurs in every engine and art tool.
Dynamic Diffuse GI
============================================================================
Upgrading Probes
----------------------------------------------------------------------------
Classic irradiance probes are popular because they fast to sample,
noise-free, work with characters and transparent surfaces, are
parameterization-free, and already implemented for most engines.
As discussed, the classic probe limitations arise from the fact that
they are usually static and can leak, and because they leak, they make
lighting artist workflow inefficient. If these problems were solved,
irradiance probes would be the right choice for many applications. So,
let's upgrade classic irradiance probes into DDGI to address those
limitations:
*Avoid Leaks*
: Store visibility information in the probes to prevent light and shadow leaking.
*Dynamic*
: Asynchronous GPU ray trace directly into low-resolution probes (no blurring of
radiance cube maps), and use a memory-coherent gather blending strategy
to amortize costs and avoid flicker.
*Workflow*
: Art cost is in avoiding leaks and bake time. Real-time updates and avoiding leaks
automatically fixes worflow.
Probe Placement
----------------------------------------------------------------------------
Here's the Greek Villa scene with a visualization of the probe locations for DDGI:
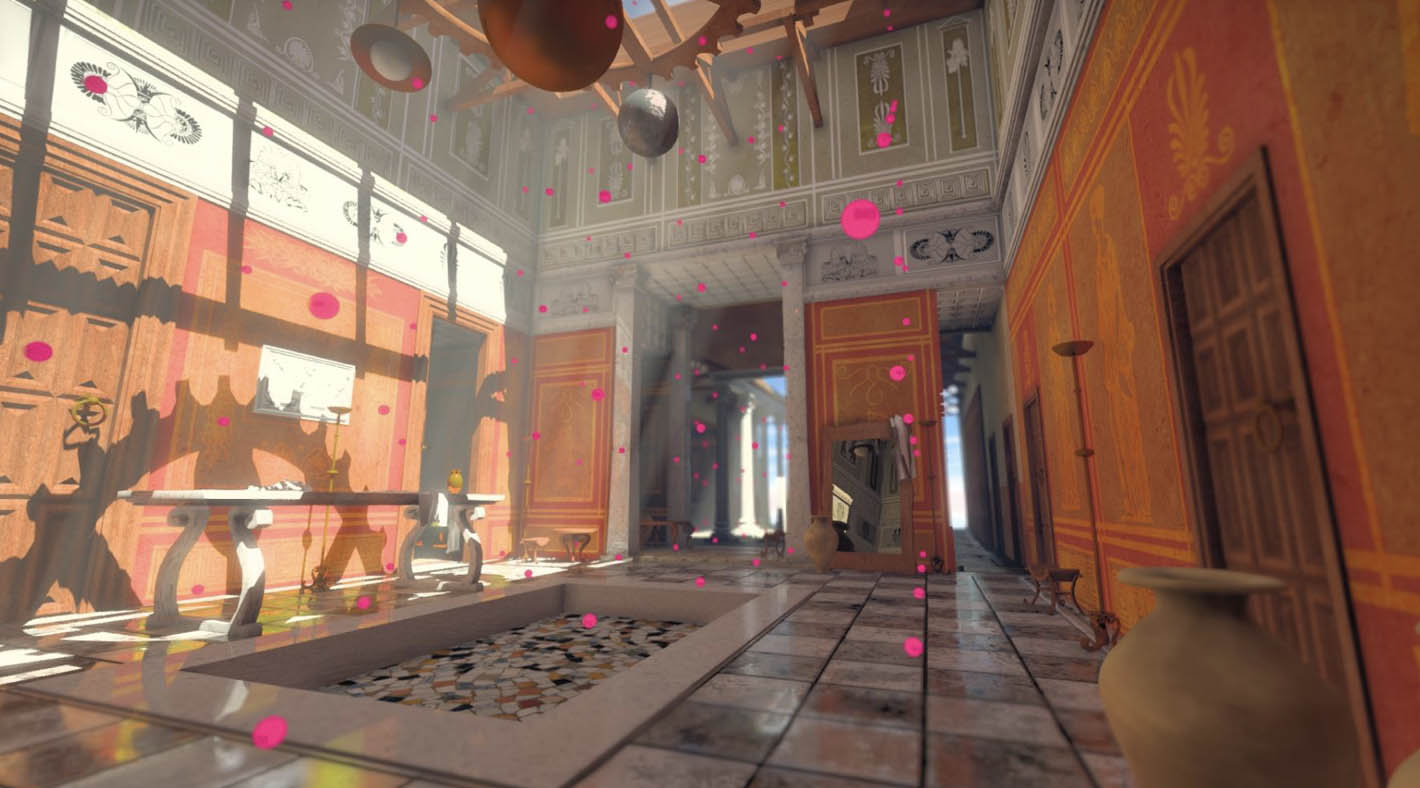
They start out in a regular grid. Unlike classic probes, you _can_ use that directly
for DDGI. All of the results here use the regular grid and sparse probes to show
the lower bound on visual quality in extreme cases.
You can also increase the probe density for higher-quality
results. Or, you can optimize the probe locations for higher-quality
results at the same memory and computation limits. The key is that you
don't have to do this in order to get good quality. So, lighting time
during production is used effectively and only where it gives improvement,
not to avoid failures.
Also, because the probes don't _have_ to be moved around geometry to function well, DDGI works for
applications where there is no "static" geometry. For example, CAD and
other DCC modeling programs, or games where players create substantial
amounts of geometry.
For cases where there is a substantial amount of static geometry,
a simple optimizer is a good choice. I describe how to approach this
later in this article. You can also refer to some of the previous research
from my collaborators on this topic [#Chajdas11] [Donow16] [Evangelakos15] [Wang19].
Artists can also move individual probes manually for specific shots or scenes.
Each probe may be moved by half a grid dimension along each axis. They essentially
move within a dual grid. The idea is to keep the indexing simple by snapping
to the nearest regular grid vertex during probe lookup while ensuring that
some probe can be at any possible location.
Cascades
--------------------------------------------------------------------------
Just as you would with shadow maps, terrain, or voxels, you should
put the probes in cascades to cover large regions. Coarse cascades
update much less frequently and cover a large region.
![Cascades of decreasing grid resolution away from the camera. Image Credits: Left [#Kaplanyan10b], Center and Right [#Asirvatham05].]](x3-cascades.jpg width=80%)
We recommend 32 x 4 x 32 = 4096 probes around the camera in the
highest-resolution grid cascade. These will update frequently. Coarse
cascades in space and time to scale out to big scenes.
Fade out and then entirely disable visibility on very coarse cascades
to halve memory consumption and shading cost, just as you would for
shadow maps.
Data Structure
----------------------------------------------------------------------------
Below is the texture memory layout for one cascade. What you're seeing on the top
of the figure is the irradiance data in a 2D `R11G11B10F` texture map, and on the bottom
one channel of the the visibility data in 2D `RG16F` format.

Each of those textures contains four large squares arranged
horizontally. These correspond to top views at different elevations of
the Greek Villa scene. The black areas are probes that are inside of
walls.
Within each of the large squares are tiny squares. Each of these is
the data for a single probe. Each is a full sphere of data projected
onto an octahedron and then unfolded into a square. The probe contains
6x6 irradiance values, including a 1-pixel border to enable fast
bilinear interpolation, and 16x16 visibility (distance) values
including their border.
At the formats and resolutions described, the irradiance data consumes
590 kB per cascade and the visibility data consumes about 4 MB. The
entire cascade is thus less than 5 MB, which is smaller than a typical
HDR framebuffer or sun shadow map cascade.
Algorithm
----------------------------------------------------------------------------
If your engine already has classic probe support, you can add dynamic
diffuse GI by repurposing existing data paths and tools. Keep the good
parts of your workflow and what you already know about probes.

The DDGI algorithm is similar to the glossy GI algorithm sketched earlier
in this part. It has three steps: trace, update probes by blending, and
then shade the points visible on screen.
*Step 1* generates 100-300 rays for each probe (192 is a good default)
and traces them through the scene. It generates a G-buffer from these
hits and runs the standard deferred shader on them.
We packed the
probe rays and G-buffer so that they fit into the bottom half of the
screen-space buffer used for the glossy GI ray trace. This means
that we can launch and shade both kinds of rays at once, which reduces
overhead and achieves better scheduling.
Because the diffuse GI
for the points that are hit by the probe rays is provided by the
probes from the previous frame, DDGI provides not just 1-bounce but
_infinite_ bounce GI, converging quickly over a few frames when
the scene changes.
*Step 2* updates the probes from the memory layout diagram with the
new shaded data. It iterates over the probe texels, and for each,
gathers all ray hitpoints that affect it and blends those in. The
blending uses a *hysteresis* value so that new and old data are
combined. This, along with some careful math for the visibility data,
ensures that results smoothly change without requiring explicit
history. This is similar to how TAA and other kinds of
exponentially-weighted moving averages (EMWA) operate. Hysteresis
values of 90% to 99.5% (of the previous frame) are viable; lower gives
faster update but can flicker. We recommend 97% hysteresis for the
general case and have some adaptive filters for special cases
described in the optimization part of this article.
*Step 3* samples the probes per pixel, per frame. This can be done
for deferred shading, forward shading, some mixture of them,
and even for volumetrics and glossy ray hits.
Step 3 is extremely fast. The main costs are 16 bilinear fetches per
sample, which are nearly perfectly coherent and so always in cache,
and at most nine division operations. It is also the only step that
is proportional to the refresh rate or screen resolution.
The more computationally intensive steps 1 and 2 are _independent_ of
frame rate and resolution. This allows you to scale the per-frame
time cost of DDGI to whatever fits your budget frame. We used 1-2ms
for our prototype on RTX 2080 Ti at 60 Hz 1920x1080. This gives
about 100 ms of latency on the indirect light, which is often
imperceptible as it is in world space, not screen space.
For lower end cards, the indirect light has more latency but the image
quality is identical when nothing is moving. While a better GPU
definitely gives a more impressive result as the scene changes, you'll
have next-generation lighting everywhere.
When combined with glossy GI ray tracing, a high-end GPU can match
offline path traced quality for the global illumination using DDGI. It
will also scale to future GPUs. Increase probe density, probe
visibility information resolution, or cascade grid extent in "ultra"
mode to sharpen indirect light shadows and provide even better lighting in
the distance.
On legacy platforms where ray tracing is too expensive, you can even
set the latency to "infinity" and use baked DDGI probes. There the GI
will not capture dynamic light sources or geometry, but it will still
improve your artist lighting workflow. So, you'll get previous
generation lighting quality with a lot less production cost.
Evaluation
----------------------------------------------------------------------------
### Diffuse Interreflection
The first test one always runs on global illumination is the real 3D
version of the toy colored box example that I described in the previous part.
Here's the "Cornell Box" on the left, showing correct color bleeding of
the red and green walls onto the white surfaces:

On the right is the orange-and-cyan box that I previously described, now with
a statue in the middle. You can see that the left side of the statue is colored
orange by the diffuse indirect light and the right side is colored by the
cyan indirect light. There is _no_ direct illumination on the statue at all.
### Accurate and Noise-free
One of the strengths of DDGI is that there is no per-pixel
noise, and thus no denoising pass or ghosting. The images below
compare an offline path tracer with 256 paths per pixel on the left to
real-time DDGI on the right. In each case, there is a white box
containing only a white spotlight and a red dragon.
When the dragon is
on the right side of the box, the box is mostly white because the
spotlight hits the white floor first with direct illumination.
When the dragon moves to the left side of the box, everything turns red because
all box surfaces are lit only by indirect light bouncing off the dragon.
This is an extreme dynamic diffuse lighting case.

It is usually acceptable for a real-time method to give slightly
different results from an offline reference path tracer. However, we need
to know what those differences are in order to art direct around
them and design content appropriately.
For this test, you can see that DDGI is very close to the path traced
reference image. There is a slight loss of contrast
inside of the dragon's mouth for DDGI, which we would recover with
screen-space radiosity or screen-space ambient occlusion. There is one
other difference: DDGI doesn't have all of the noise from path tracing.
In this aspect, the real-time method is actually better than path tracing.
### Dynamic Lighting
Dynamic lighting, especially time of day changes, are one of the primary
features of a global illumination system. Players and designers both
want lighting cycles for games to be affect not just direct sunlight
but also all of the indirect lighting and any local geometric changes.
The following figure shows two different locations each at two times of day.
In each, the lighting shifts from mostly direct to mostly diffuse global
illumination as the sun sets and shadows shift. Note that all of the
diffuse GI matches both the changing sun and sky colors as well as
the overall intensity and direction of lighting.
Unlike interpolation between baked probes, no additional storage space
is required for these transitions and they are continuous. During sunset,
the GI colors rapidly shift through many different shades that could not
be captured by a small number of baked probe variations.

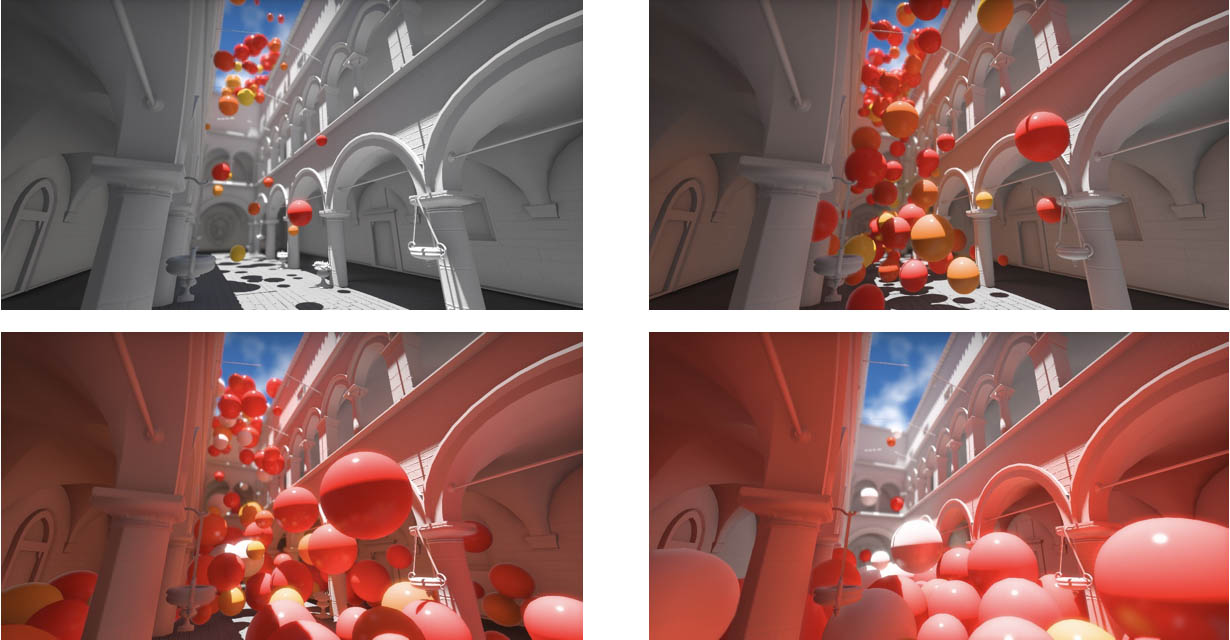
### Dynamic Geometry
Dynamic geometry is the most difficult case for probes. There is no place
to put the probes where dynamic geometry can't intersect them during gameplay.
Both irradiance and visibility are constantly changing due to moving objects.
The worst situation is when a characters stands right where a probe is, suddenly
making that probe go dark and leaking shadow everywhere.
Previous real-time diffuse GI approximations have to put probes high in the air
in the hope that characters won't walk through them. We created a really hard
test that defeats that strategy: a hundred bright beach balls tumbling into
a courtyard using physical simulation (here PhysX on the GPU).
The balls are constantaly passing around and through the probes, so there is
no safe place to hide the probes. In the video you can see that DDGI correctly
computes the visibility at every frame, so even though the balls are bouncing
chaotically there are no shadow leaks. You can also see that DDGI
correctly scatters red and yellow diffuse GI from the balls onto
the walls and reflects light from the walls back onto the balls.

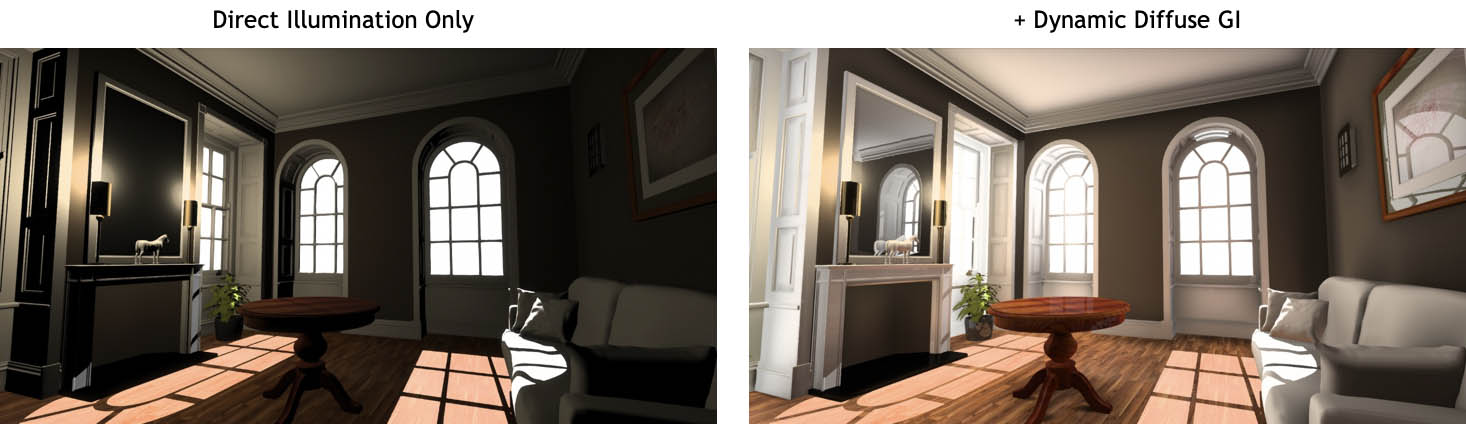
### Realistic
Here are three complex scenes that were originally designed for _offline_
rendering. These show DDGI and ray traced glossy GI interacting correctly.
The left column shows the direct illumination contribution only.
The right side shows the result with full global illumination.
All run in 1-2 ms per frame.


### Large Scenes
DDGI can use a variety of techniques for scaling to large scenes within a fixed time
budget, including sleeping, priority scheduling, and cascades.
To show performance even under brute force, for this scene we loaded a 1 km^2 scene and
filled it with 16,000 probes. We then updated _every_ probe every frame on GeForce RTX 2080 Ti.
This takes about 4 ms per frame for DDGI and is able to handle dynamic lighting and geometry
across this large area.

With proper cascades, that runtime can be limited to 2 ms on this GPU and can span a practically
unlimited view distance due to the exponential range in the number of cascades.
### Avoids Leaks
The core of DDGI is of course computing visibility per probe sample to avoid leaks.
Without that they could not be dynamic or enable efficient lighting workflow. Here
is a targetted test case to compare leaking between classic irradiance probes
and DDGI. Each uses the same resolution and probe locations.
I built this simple house, which is lit by a white directional light. The ground plane is orange
so that diffuse GI will be obviously tinted orange to distinguish it from leaks.
The colored spheres show the probe locations in this image:

Inside, the house is divided into two rooms. One room has the open doorway to outside,
allowing light to flow in. The other is completely sealed. The open room should have
subtle, multi-bounce diffuse GI. The sealed room should be black everywhere. Here is
the interior of the open room.

Note that the setup corresponds to the case where Hooker [#Hooker16] showed light leaking
in an early _Call of Duty_ build (they fixed this by artist intervention and some clever tools).
They had light leaking from the bright sun hitting the roof and leaking onto the interior ceiling.
DDGI eliminates this light leak. There is some bright light on the ceiling in the DDGI image--that
is the orange light that bounced off the ground and correctly lit the ceiling!
To evaluate both rooms, I moved the camera to a bird's eye top view and lowered the near clipping
plane. This cuts the roof off the building in the camera's view, but leaves it present in the
lighting simulation so that we can see inside without disturbing the scene.

On the left are classic light probes. They leak significant light into both rooms of the house,
and also leak shadow out though the wall at the bottom of the image. On the right side, the house
lit by DDGI has no light or shadow leaks. The sealed room is 100% black.
The following figure shows a more complex scene of a cathedral. It is entirely lit by the sun, which
is very bright on the exterior, and reflects white off interior walls or red off interior carpet
(not visible in these angles). The classic light probes on the left give an attractive image,
but it is wrong. Most of the light here is actually leaking through the exterior wall. In some
places, probes inside walls are also leaking darkness. DDGI corrects both.

Tilting the camera up to the inside of the cupola shows even more obvious leaks from probes on the
exterior, which DDGI also fixes:

### Video Walkthrough
Here's a video of DDGI and individual terms in motion from a live recording
of an early Feb 2019 build.

The following parts of this article describe the latest best
practices, which have slightly improved performance and image quality
and significantly improved indirect lighting lag since the build
captured in this video.
Summary
===================================================================
I've now given an overview of the previous state of the art and a
complete system for next-generation global illumination using ray
traced glossy GI and Dynamic Diffuse Global Illumination. I also
showed an evaluation on some targeted test cases of the image quality.
This should provide enough information to make a decision on whether
the DDGI solution is a good fit for your real-time diffuse lighting needs.
If it is, implementors will want to read the next three parts of this
article. They decribe the mathematics of the key algorithms, provide
a detailed implementation guide, and then give advice on optimizing
for performance and quality in production.
[ <== Previous Page: Global Illumination](intro-to-gi.html)
[Next Page: Algorithm Deep Dive ==> ](algorithm.html)
* * * *
I wrote this blog article in collaboration with my colleagues [Zander Majercik](https://research.nvidia.com/person/zander-majercik)
and [Adam Marrs](http://www.visualextract.com/) at NVIDIA.
* * * *
The "personal communication" references below are primary sources of developers who worked on these games.
[#Archard19]: Archard, Zhdan, Shyshkovtsov, and Karmalsky, [Exploring Raytraced Future in Metro Exodus](https://developer.nvidia.com/4a-and-nvidia-exploring-raytraced-future-metro-exodus-gdc19), GDC Talk, 2019
[#Asirvatham05]: Asirvatham and Hoppe, [Terrain Rendering Using GPU-Based Geometry Clipmaps](http://hhoppe.com/gpugcm.pdf), GPU Gems 2, Pharr and Fernando eds., 2005
[#Barrett19]: Barrett, [Personal communication: Just Cause 3 and 4 used RSM](https://twitter.com/_dbarrett/status/1124322879020118016), May 3, 2019
[#Metro19]: Battaglia, [Interview with Ben Archard on _Metro: Exodus_](http://casual-effects.com/research/Mara2017Denoise/index.html), _Eurogamer_, Feb 17, 2019
[#Blinn76]: Blinn and Newell, Texture and reflection in computer generated images, _CACM_, Vol. 19, No. 10, pages 542-547, October 1976
[#Crassin11]: Crassin, Neyret, Sainz, Green, and Eisemann, [Interactive Indirect Illumination Using Voxel Cone Tracing](https://research.nvidia.com/sites/default/files/pubs/2011-09_Interactive-Indirect-Illumination/GIVoxels-pg2011-authors.pdf), _Pacific Graphics_, 2011
[#Chajdas11]: Chajdas et al., Assisted Environment Map Probe Placement, SIGRAD 2011
[#Dachsbacher05]: Dachsbacher and Stamminger, [Reflective Shadow Maps](http://www.klayge.org/material/3_12/GI/rsm.pdf), _I3D_, 2005
[#Deligiannis19]: Deligiannis, Schmid, and Uludag, [It Just Works: Ray-Traced Reflections in _Battlefield V_](https://on-demand-gtc.gputechconf.com/gtcnew/sessionview.php?sessionName=s91023-it+just+works%3a+ray-traced+reflections+in+%22battlefield+v%22), GTC Talk, 2019
[#Ding]: Ding, [In-Game and Cinematic Lighting of _The Last of Us_](https://www.gdcvault.com/play/1020475/In-Game-and-Cinematic-Lighting), GDC Presentation, 2014
[#Donow16]: Donow, Light Probe Selection Algorithms for Real-Time Rendering of Light Fields, Williams College Thesis, 2016
[#Evangelakos15]: Evangelakos, A Light Field Representation for Real Time Global Illumination, Williams College Thesis, 2015
[#Gilabert12]: Gilabert and Stefanov, [Deferred Radiance Transfer Volumes: Global Illumination in _Far Cry 3_](https://www.gdcvault.com/play/1015326/Deferred-Radiance-Transfer-Volumes-Global), Talk at GDC, 2012
[#Greger98]: Greger, Shirley, Hubbard, and Greenberg, [The Irradiance Volume](https://www.cs.utah.edu/~shirley/papers/irradiance.pdf), _IEEE CG&A_, 18(2):32-43, 1998
[#Hooker16]: Hooker, [Volumetric Global Illumination at Treyarch](https://www.activision.com/cdn/research/Volumetric_Global_Illumination_at_Treyarch.pdf), SIGGRAPH Advances in Real-Time Rendering Course, 2016
[#Iwanicki13]: Iwanicki, [Lighting Technology of "The Last of Us"](http://miciwan.com/SIGGRAPH2013/Lighting%20Technology%20of%20The%20Last%20Of%20Us.pdf), SIGGRAPH Advances in Real-Time Rendering Course, 2013
[#Kaplanyan09]: Kaplanyan, [Light Propagation Volumes in _CryEngine 3_](http://advances.realtimerendering.com/s2009/Light_Propagation_Volumes.pdf), SIGGRAPH Advances in Real-Time Rendering Course, 2009
[#Kaplanyan10]: Kaplanyan, [Real-time Diffuse Global Illumination in _CryENGINE 3_](http://citeseerx.ist.psu.edu/viewdoc/download?doi=10.1.1.233.71&rep=rep1&type=pdf), SIGGRAPH Presentation, 2010
[#Kaplanyan10b]: Kaplanyan and Dachsbacher, [Cascaded Light Propagation Volumes for Real-Time Indirect Illumination](http://citeseerx.ist.psu.edu/viewdoc/download?doi=10.1.1.233.104&rep=rep1&type=pdf), _I3D_ 2010
[#Keller97]: Keller, [Instant radiosity](https://dl.acm.org/citation.cfm?id=258769), _SIGGRAPH_, 1997
[#Malmros17]: Malmros, [_Gears of War 4_: custom high-end graphics features and performance techniques](https://dl.acm.org/citation.cfm?id=3085162&dl=ACM&coll=DL), SIGGRAPH Talk, 2017
[#Mara17]: Mara, McGuire, Bitterli, and Jarosz, [An Efficient Denoising Algorithm for Global Illumination](http://casual-effects.com/research/Mara2017Denoise/index.html), _HPG 2017_, July 27, 2017, 7 pages
[#McLaren16]: McLaren, [Graphics Deep Dive: Cascaded voxel cone tracing in _The Tomorrow Children_](https://www.gamasutra.com/view/news/286023/Graphics_Deep_Dive_Cascaded_voxel_cone_tracing_in_The_Tomorrow_Children.php), Gamasutra, November 28, 2016
[#Mitchell06]: Mitchell, McTaggart, and Green, [Shading in Valve’s _Source_ Engine](https://steamcdn-a.akamaihd.net/apps/valve/2006/SIGGRAPH06_Course_ShadingInValvesSourceEngine.pdf), SIGGRAPH Advances in Real-Time Rendering Course, 2006
[#Quake]: ID Software, Quake II, 1998
[#Qian19]: Qian and Yang, [RTX in Justice](https://developer.nvidia.com/gdc19-rtx-justice-v-1-0), GDC Talk, 2019
[#Rakhteenko18]: Rakhteenko, [Baking artifact-free lightmaps on the GPU](Rakhteenko, Baking artifact-free lightmaps on the GPU, 2018 https://ndotl.wordpress.com/2018/08/29/baking-artifact-free-lightmaps/), Blog 2018
[#Ramamoorthi11]: Ramamoorthi and Hanrahan, [An Efficient Representation for Irradiance Environment Maps](http://www.cs.virginia.edu/~jdl/bib/envmap/representation/ramamoorthi01.pdf), _SIGGRAPH_, 2001
[#Sassone]: Sassone, [Personal communication: Dirt Showdown used VPLs](https://twitter.com/GabrielSassone/status/1124262411408687104), May 3, 2019
[#Schied17]: Schied, Kaplanyan, Wyman, Patney, Chaitanya, Burgess, Liu, Dachsbacher, Lefohn, and Salvi, [Spatiotemporal variance-guided filtering: real-time reconstruction for path-traced global illumination](https://research.nvidia.com/sites/default/files/pubs/2017-07_Spatiotemporal-Variance-Guided-Filtering%3A//svgf_preprint.pdf), _HPG '17_, July 27, 2017, 12 pages
[#Sousa11]: Sousa, Kasyan, and Schulz, [Secrets of _CryENGINE 3_ graphics technology](http://www.crytek.com/cryengine/presentations/secrets-of-cryengine-3-graphics-technology). SIGGRAPH Advances in Real-Time Rendering, 2011
[#Stachowiak15]: Stachowiak, [Stochastic Screen-Space Reflections](https://www.ea.com/frostbite/news/stochastic-screen-space-reflections), SIGGRAPH Advances in Real-Time Rendering, 2015
[#Tatarchuk05]: Tatarchuk, [Irradiance Volumes for Games](https://developer.amd.com/wordpress/media/2012/10/Tatarchuk_Irradiance_Volumes.pdf), GDC Presentation, 2005
[#Valient14]: Valient, [Taking _Killzone Shadow Fall_ image quality into the next generation](http://www.guerrilla-games.com/presentations/GDC2014_Valient_Killzone_Graphics.pdf), Presentation at GDC, 2014
[#Wang19]: Wang et al., Fast Non-Uniform Radiance Probe Placement and Tracing, I3D 2019
[#White19]: White, [Personal communication: Gears of War 4 used RSM + VPLs](https://twitter.com/ZedCull/status/1124364928104534020), May 3, 2019
[#Wronski14]: Wronski, [_Assassin’s Creed 4: Black Flag_, the road to next-gen graphics](http://bartwronski.files.wordpress.com/2014/03/ac4_gdc.pdf), GDC Presentation, 2014
[#Xu16]: Xu, [Temporal Antialiasing In _Uncharted 4_](https://t.co/xSG2QJzPrP), SIGGRAPH Advances in Real-Time Rendering Course, 2016